Mk the c s ch
O
Z zxf ajdalm
Saturday, November 10, 2012
Sunday, October 28, 2012
Finding the blessings in your terrible day.
This weekend the Mr. and I had a lot to do! Today Mr. had scheduled a big motocross race. We got up early, 5 am ouch! We drove 30 minutes. He raced and I chased our kiddo around. He had 4 races for 2 classes so he was busy. We had all our gear and tools set up at our car.
In MX sports most attendees are trustworthy. Everyone watches out for everyone. There are thousands of dollars of equipment just sitting out on trailers and next to trucks. Mr. got his 1st and 2nd trophies (yay!) and headed to the car. Loaded up our gear and realized we had been robbed!
Our tool box and air tank had been stolen from the back of our trailer. A couple thousand dollars worth of tools are gone. At first I felt victimized and filled with anger, sorrow, and bitterness. Then I stopped crying. I trust my Holy Father. I know that bad things happen, for no reason and for reasons. So I prayed. I thanked him for all the blessings we have. Our car was unlocked and all our money was inside. Our cash envelopes, my purse, our phones with photos, all in the car. Thank God that none of that was touched! Photos are not replaceable.
No one lost their life. No one was physically injured. Maybe that person who stole from us will use those tools to repair something that could've seriously hurt someone. All is not lost. It hurts to feel violated but I'm not wearing a robe of bitterness and anger. No thanks!
Wednesday, October 17, 2012
Indie meets The Austin Quilt
Remember that vintage feeling quilt I made? The Austin Quilt and the pattern is plain spoken. Well I got a chance to do it again. Here is the Indie Collection by Pat Bravo.
Find it here http://www.hawthornethreads.com/fabric/designer/patricia_bravo/indie
I really love this little gem. I made a mini quilt too. :) yay!


Find it here http://www.hawthornethreads.com/fabric/designer/patricia_bravo/indie
I really love this little gem. I made a mini quilt too. :) yay!
Friday, September 28, 2012
Strip to high heaven
I started this beauty nearly 5 months ago. I'd hate to admit it but I purchased the fabric 10 months ago! I saw lots of strip quilts floating around and thought "oh that's so quick and easy!" Easy? Yes. Quick? No.
There's something about piecing cool designs together that makes quilting fun. Running straight strip around another straight strip continually isn't as much fun. It's not a really time consuming task but its boring.
I kept sewing 2 sets of layers on and then I'd stop...for weeks! Finally I pushed through and finished it.
I'm going to go back to what I like. :)
Tuesday, September 25, 2012
Make this changing mat! Super easy!
http://www.madebymarzipan.com/?x=3285
This is one of the fastest, easiest tutorials I've tried! I made the first one in under 2 hours (with toddler distraction!) and the second one in an hour, if that! Give it a try!


This is one of the fastest, easiest tutorials I've tried! I made the first one in under 2 hours (with toddler distraction!) and the second one in an hour, if that! Give it a try!
Monday, September 24, 2012
Your Voice Counts Day!
Did you have a wonderful, empowering birth experience? Did you have a traumatic birth experience that made you feel hurt and confused? Stand up and tell somebody! On Thursday, November 22nd (Thanksgiving) join us in mailing letters to hospital administrators, birth center directors, and other birth workers to tell our stories. How will hospitals and birth workers know how they're doing if we don't tell them? Whether your birth happened sixty minutes ago, sixty days ago, or sixty years ago, your experie...nce matters. We cannot be ignored if we unite and flood these establishments with letters at the same time. Stand up and be counted on Your Voice Counts Day.
https://www.facebook.com/#!/events/415706168477663/
https://www.facebook.com/#!/events/415706168477663/
Saturday, August 25, 2012
Failure
When I sit down to sew there are a few things I desire. One of them is perfection. I know it's unrealistic to expect perfection while sewing. Many of the quilts I make have minor flaws that I say "defines them and gives them character." However, I still desire nice clean, neat, perfectly straight or curved stitches, crisp lines, etc. I'm learning as I sew to stop letting the desire for perfection ruin the beauty and joy of the project. You'd think after 10 years of quilting I would know by now! Juggling motherhood and crafting are difficult. So the time I get to sew is limited and I cannot be as meticulous as I once was. We are all our toughest critics right? I think sometimes that's very true. Other times we picked the wrong person to craft for! Ha!
I stumbled upon these two gems just now. They both are so true. Thanks for the reminder, world!

I stumbled upon these two gems just now. They both are so true. Thanks for the reminder, world!
Friday, August 3, 2012


Saturday, July 28, 2012
Texas Flag Quilt
I've been sewing. I still have to appliqué my star on but I love how this turned out.
60in x 90in.
4 shades of each color. 1/2 yard of each shade. 15 rows in each color.
60in x 90in.
4 shades of each color. 1/2 yard of each shade. 15 rows in each color.
Friday, July 27, 2012
Some things just don't work, at first.
Sometimes when I'm sewing I have great ideas! My head is full of thousands of brilliant masterpieces. Here is one that I failed at. I sewed this beautiful stretchy ruffle fabric onto wonderfully soft minky. They both stretch. I didn't use my walking foot. So the finished product isn't perfect. It's edges don't lay flat. Next time I know better.
It is for sale. Email barlowbabyquilts@gmail.com
It is for sale. Email barlowbabyquilts@gmail.com
Tuesday, July 24, 2012
Cheat on that casing!
So you're making something that involves threading elastic or other material through a casing or tunnel. It's so tedious to sit there and push the elastic through little by little. Here's what I do.
1) Buy a bundle of elastic. Measure and mark your elastic at your desired length. Make an arrow so you know which side is the correct length.
2) Pin the elastic onto your fabric.
3) Sew the casing with the elastic inside, leave your usual opening. Be sure not to sew over the elastic!
4) Pull the excess elastic until you find your mark.
5) Stitch together, cut excess, and close!
Tuesday, June 19, 2012
Modge Podge Fabric Coasters DIY

You'll need:
Tiles, modge Podge (the finish is upto you,) fabric pieces, paint brush, & clear coat.

Cut your fabric to fit your tiles. You can make shapes or anything you desire.
Paint a layer of MP on your tile. Well do one at a time. Quickly apply your fabric. You have a few seconds to make adjustments.

Smooth, but do not stretch, the fabric over tile evening and flattening it out.

Let it sit and work with your other tiles.
Go back to the first tile and apply 1 or more costs of MP over the fabric. Allow it to set in between layers.

Let it dry completely. Spray your clear coat on top. Let that dry. All done!

Thursday, June 14, 2012
Win a mini quilt!
Hey there everyone!
Do you want to win a mini quilt? This has got to be the easiest contest ever. All you have to do is submit a photo of a quilt you absolutely love. You can email it, post the pin, post the link, find a way to get it to me! From the submissions I will pick my favorite. The winner will recieve a mini quilt. Whats a mini quilt? Its a small quilt used for decoration. Google it :)

Emails can be directed to barlowbabyquilts@gmail.com
You have until June 25th 12:01am. Only one submission per person. If you submit one then find a better one ill count whichever one you like better. You must clearly identify which you like best in that case. AND GO!!!!
Do you want to win a mini quilt? This has got to be the easiest contest ever. All you have to do is submit a photo of a quilt you absolutely love. You can email it, post the pin, post the link, find a way to get it to me! From the submissions I will pick my favorite. The winner will recieve a mini quilt. Whats a mini quilt? Its a small quilt used for decoration. Google it :)

You have until June 25th 12:01am. Only one submission per person. If you submit one then find a better one ill count whichever one you like better. You must clearly identify which you like best in that case. AND GO!!!!
Sunday, June 10, 2012
Learn to quilt from the best!
Have you always wanted to sew or quilt? One excellent way to learn is to join your local guild. By joining you're insuring that sewing and quilting have a future in your community! You're support a local charity that gives back to the community.
What do they do at the guild? They offer classes of all kinds! Not just quilting but other crafts too. They hold retreats. They volunteer in the community by donating quilts, teaching or reading to children, or even helping veterans in need. Many guild meeting have special speakers who are some well know teachers and authors!
Don't be afraid! Jump in! Meet new people. Many of these men and woman have been sewing for decades! Learn from the best!
In San Antonio? Here's our link: http://www.sanantonioquilt.org/
Google "(your city) quilt guild!"
Be my guest! Come join me next month.
Sunday, June 3, 2012
DIY Starbucks Venti Cold Cup Insert
DIY Starbucks Venti Cold Cup Insert


Tools: Paper, pen, scissors or rotary cutter, ruler, and your sewing machine.
NOTE: You can make a simple insert using scrapbook paper! It's changeable and only involves cutting. No need to spray on glitter, just buy glitter card stock.
Tip: Do not get your insert bulky or it wont fit inside the cup. I found that sewing the insert worked best.
Getting started:
Step 1: You'll want to make your insert template. If you have a venti cup your insert template will look similar to this. If you have a different size you'll just have to mess around until you get it perfect. I took a regular sheet of computer paper, rolled it, wrapped it around the inner part of the cup and drew lines over the excess. I then cut the excess off and made any adjustments needed to properly fit. It may take you several tries. Make 2 templates in case you want to make another later.

Step 2: Start with a few pieces. I cut various fabrics into strips or triangles. I took 2 pieces and sewed them together. As you are building your insert you'll want to cut some excess or cut a straight line to make it easy for the next fabric to attach. Keep doing this until your insert is bigger than your template. Check the fitting inside your cup and adjust.
Step 3: Attach your insert to your template by laying the insert on top of the template and sewing lines or zigzags or swirls all over the two. Be careful not to sew over the same area repeatedly because it will bulk up too much. I attached the template to the insert fabric to give it strength inside the cup. Trim any area that needs trimmed along all 4 sides. Check the fitting inside your cup and adjust.
Here are some examples. Start from the inside and work your way out. You can also start from one side and work toward the other! Let me see what you make!


Tools: Paper, pen, scissors or rotary cutter, ruler, and your sewing machine.
NOTE: You can make a simple insert using scrapbook paper! It's changeable and only involves cutting. No need to spray on glitter, just buy glitter card stock.
Tip: Do not get your insert bulky or it wont fit inside the cup. I found that sewing the insert worked best.
Getting started:
Step 1: You'll want to make your insert template. If you have a venti cup your insert template will look similar to this. If you have a different size you'll just have to mess around until you get it perfect. I took a regular sheet of computer paper, rolled it, wrapped it around the inner part of the cup and drew lines over the excess. I then cut the excess off and made any adjustments needed to properly fit. It may take you several tries. Make 2 templates in case you want to make another later.

Step 3: Attach your insert to your template by laying the insert on top of the template and sewing lines or zigzags or swirls all over the two. Be careful not to sew over the same area repeatedly because it will bulk up too much. I attached the template to the insert fabric to give it strength inside the cup. Trim any area that needs trimmed along all 4 sides. Check the fitting inside your cup and adjust.
Here are some examples. Start from the inside and work your way out. You can also start from one side and work toward the other! Let me see what you make!


Purchase your cold cup here: http://www.starbucksstore.com/cold-cup-kit-24-oz/bundleColdCup24oz,default,pd.html?start=1&cgid=drinkware
That vintage feeling
I love this quilt. Since I haven't shared it here before I figured hey I might as well! It has a really simple design and its super fun. The family I made it for had a very specific feel that they wanted to go with. At the same time we didn't quite know how to get there. So off to the store I went. I really had fun picking out the fabrics for this one.
They are all so beautiful, random, and bright. While I was making it I thought boy this just isn't going to look ok at all. Honestly I don't usual make quilts that have a real vintage feel. I like to stick with color pallets and matching themes. Before modern advances in fabric making I don't think people had the luxury of going to the store and picking 20 different purple fabrics. Ha.
So the end result has a very homey vintage feeling. It reminds me of something your grandma would give you and you would cherish for life! I love it! These photos were taken by Whitney at http://www.leavesofmytree.blogspot.com She's pretty amazing. Go check her out!
If you would like to order a similar quilt please message me. If you would like the names of some of the prints let me know. I can find them.


Tuesday, May 29, 2012
Circus love!
So you've been looking for a circus print have you? Well have I got the quilt for you. I stumbled upon these darling prints about 8-9 months ago. It's been sitting there begging to be crafted. Finally I got a chance to do my magic with these. The front is a preprint panel. The back I used the coordinating prints to create a simple strip pieced back. It's so cute! I folded the back into the front to create the binding. It turned out perfectly.


https://www.etsy.com/listing/100885294/simply-darling-toddler-crib-circus-quilt


https://www.etsy.com/listing/100885294/simply-darling-toddler-crib-circus-quilt
Sunday, May 27, 2012
Oliver's Owls!
Oh boy! This was a very fun quilt. I have been waiting patiently for an order with owls in it. In fact I have several owl prints that Ive been holding on to for the right time. The mommy and I went through some online sources until we found the perfect owl print. We used similar colors that were in the print. I was excited to try my hand at a 3-d pinwheel quilt. This one is absolutely darling!
Quilts like this one are available for purchase http://www.etsy.com/shop/rlbarlow or http://www.facebook.com/barlowbaby2 I will not replicate a quilt that I have made for another customer but you can order one similar. We all want unique gifts right!


Pattern is here: http://pinterest.com/pin/66428163223908492/ Follow the instructions on the pin to access the pattern. If viewing from a handset I will warn you that I had to get on the computer to view and purchase the pattern.
Sunday, May 20, 2012
Making a big big gift.
Many of you are familiar with my April quilt project because you have followed along on Facebook at http://www.facebook.com/barlowbaby2. I wanted to share the official finished project over here. Around April 1st I started a massive project to make a 90 by 90in quilt with over 1500 pieces. My friend was getting married and I wanted to give it to her as a gift. So I spent April cutting and sewing. That is all I did all month. I swear! I got so tired of sewing that I wanted to go out of business haha. Well without further ado here is the big beauty! Along with a link to the pattern.


This photo was taken outside. Please excuse the son spot and wavy look. It was blowing in the breeze.

Photos taken by Kristen Rake at http://www.facebook.com/rakephotography
http://www.etsy.com/listing/84726131/quilt-pattern-quick-and-easy-layer-cake?ref=cat_gallery_2
Friday, May 18, 2012
There is real talent here.
I went on vacation for a week. I just got home in the middle of this week. When I came home I was warned "Do not go into the garage!" Oh yay! That meant there was something in there for me. I was very excited and anxious to see. You see, my birthday is today. My darling husband made me something! He is one truly talented guy. Among the things he has made me are: an iron lily, a wooden box with copper lilies inside, and a wooden photo album. Thats just to name a few. Just recently he took one of my belts and took 3.5 inches off it so I could still enjoy wearing it. I am one lucky lady. So without further ado here is my birthday gift.
 It is a mini replica of my rocking chair. It comes with a quilt attached that is in the process of being put together. My rocker was a resale shop find. While he was researching for this project he found out that my chair is a mans chair. It was made in the 1890's! It is officially my oldest possession! I love it! I love both of these so much.


Tuesday, May 1, 2012
Just keep sewing till you go crazy!
Why does any sane person take 12 different fabrics, cut them into tiny pieces, then sew them back together? Every quilter does it! Recently I started a very challenging project. Not only is it huge, 90in. By 90in. unfinished, but I had a deadline too. I'm going to my friends wedding and I needed this project finished before I left. So logic would tell you to start months in advance. I have no logic. I started in April. I leave in May. So for the last 4 weeks I have sewn, cut, and ironed over 1500 pieces together. I have slaved away in my crafting sanctuary to the point of no return. I have cried in fear of not completing this monstrous beauty.
Here we are May 1st. All 100 blocks are complete. These last steps are the easy part. Sew it together, quilt it, finish it. Done!! So soon this loving piece of artwork will be completed and on its way to its new home. It's always a sad and happy experience. I'm thrilled to hear the praises of love from the customer but sad to watch my hard work leave. Ah, it is so worth it though. So I continue to sew, to procrastinate, and to rejoice when they are finished.
Just keep sewing!
Friday, April 20, 2012
Ode to the Jelly Roll!
When I first started quilting I couldn't understand why people bought Jelly Rolls. I sure do now! I took on quite a challenge with my current project. It requires 1500 pieces. The size will be over 90 by 90 when its done. That's pretty big to me since I make mostly children quilts. So lots and lots and lots of hours cutting! This is where the Jelly Roll is worth its weight in gold. Its a bunch of 2 1/2 in strips that are already cut for you. Boy that could save me lots of time. Now if you have a cutting system like the Accuquilt then you can bust out these strips pretty fast. Ive been doing it the old fashioned way. :/
There are a ton of cute quilts you can make using jelly rolls.

Like this one! http://quiltstory.blogspot.com/2012/04/sues-half-moon-modern-log-cabin.html
Or this one http://quiltinggallery.com/quilters-market/product/299/38/just-breezy/
Want awesome Jelly Rolls... go here http://www.fatquartershop.com
http://www.accuquilt.com

Wednesday, April 18, 2012
Dear Mr. Postman!
I love you!
Today the postman brought Ace his own glorious sewing machine. I know what your thinking but it is safe. Trust me! It's wooden! No sharp needle. It uses yarn and Ace's manpower to move the components! Hopefully this helps him with his desire to touch my machines. So far it hasn't worked. Ha. I think it's very important to teach our young children a skill that could come in handy in daily life especially if we have to revert to trading to make a living. So Ace gets to learn how to sew. I'm sure daddy will teach him how to weld too.

Today the postman brought Ace his own glorious sewing machine. I know what your thinking but it is safe. Trust me! It's wooden! No sharp needle. It uses yarn and Ace's manpower to move the components! Hopefully this helps him with his desire to touch my machines. So far it hasn't worked. Ha. I think it's very important to teach our young children a skill that could come in handy in daily life especially if we have to revert to trading to make a living. So Ace gets to learn how to sew. I'm sure daddy will teach him how to weld too.

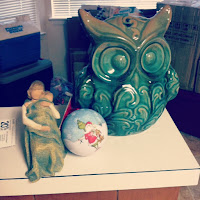
This postman also brought us some goodies from our family out of state. We moved during Christmas time so they had been keeping them until we got settled in. My sister bought me this lovely owl! It is absolutely beautiful! My mom bought Ace his Grinch ornament and I got the Willow Tree figurine. Its called The Quilt. How fitting. I love it! What a wonderful day at the mailbox! Yay :)

Subscribe to:
Comments (Atom)